How To Install phpMyAdmin In Ubuntu
Websolutionstuff | Jul-24-2023 | Categories : Laravel PHP
In this article, we will explore the process of installing phpMyAdmin in Ubuntu. phpMyAdmin is a popular web-based administration tool for managing MySQL and MariaDB databases. It provides a user-friendly interface that allows you to perform various database operations such as creating, modifying, and deleting databases, tables, and executing SQL queries.
In the following sections, we will provide you with a step-by-step guide on how to install phpMyAdmin on your Ubuntu system. We will cover the necessary commands and configurations to ensure a successful installation.
We will see how to install phpmyadmin in ubuntu 22.04, how to install phpmyadmin in ubuntu 21.10, ubuntu 21.04, ubuntu 20.04, ubuntu 18.04 and ubuntu 16.04.
So, let's get started and learn how to install phpMyAdmin in Ubuntu.
Update Package Lists
Open a terminal window and run the following command to update the package lists.
sudo apt update
Install MySQL Server
Once the package lists are updated, you can proceed to install MySQL Server by running the following command:
sudo apt install mysql-server
Install Phpmyadmin
Then, you can proceed to install phpMyAdmin by running the following command
sudo apt install phpmyadmin php-mbstring php-zip php-gd php-json php-curl
Now, we will create a user for MySQL using the following command.
mysql -u root -p

CREATE USER 'root'@'localhost' IDENTIFIED BY 'password';

GRANT ALL PRIVILEGES ON * . * TO 'root'@'localhost';

FLUSH PRIVILEGES;
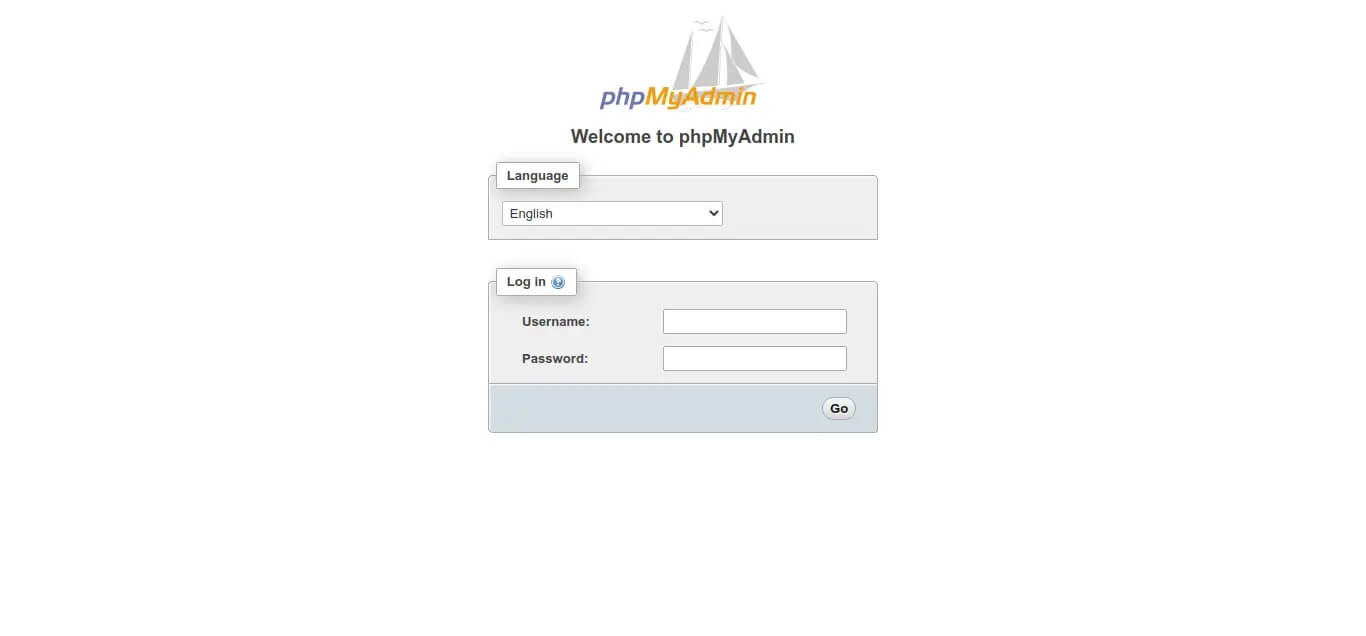
Now you can go to your browser and open IP or localhost then you will find the below layout:
http://localhost/phpmyadmin
http://your_domain_or_IP/phpmyadmin
Output:
After you restart Apache2 you may not be able to see the phpmyadmin login page.
Open apache.conf file:
sudo nano /etc/apache2/apache2.conf
Then add the following line to the end of the file.
Include /etc/phpmyadmin/apache.conf
Restart Apache:
sudo /etc/init.d/apache2 restart
You might also like:
- Read Also: How To Install Angular In Ubuntu
- Read Also: How To Install PHP CURL Extension In Ubuntu
- Read Also: How To Fix MySQL Shutdown Unexpectedly In XAMPP
- Read Also: How To Create User Roles And Permissions In Laravel 10
Recommended Post
Featured Post

How To Remove Column From Tabl...
In this article, we will see how to remove columns from a table in laravel 10 migration. Here, we will learn about...
Apr-26-2023

Laravel 11 Vite Install Sweeta...
Hello, laravel web developers! In this article, we'll see how to install sweetalert2 in laravel 11 vite. Sweeta...
Jul-15-2024

How To Encrypt And Decrypt Str...
In this example we will see how to encrypt and decrypt string in laravel 8 using crypt helper, As we all know laravel fr...
May-07-2021

Laravel whereDate and whereDay...
In this article, we will see laravel whereDate and whereDay examples. As you all know laravel provides many in...
Jan-21-2021