How To Change Datepicker Start Date In Angular 15
Websolutionstuff | Jul-03-2023 | Categories : Angular
In this tutorial, I will guide you through the process of changing the start date of a datepicker component in Angular 15. The datepicker is an essential element that enables users to select dates conveniently.
In this tutorial, I will explain each step in detail, allowing you to confidently change the start date of your datepicker component in Angular 15.
We will cover the installation of Angular Material, importing the necessary modules, creating a datepicker component, and finally, implementing the change of the start date.
However, there are instances when we need to customize the initial start date based on specific requirements. With the power of Angular 15, we can easily modify the start date of the datepicker component and provide a more personalized user experience.
Table of Contents:
- Prerequisites
- Install Angular Material
- Import Angular Material Modules
- Create Datepicker Component
- Change Start Date
- Run Angular 15 Application
- Conclusion
So, let's get started and explore how to change the start date in date picker in Angular 15 using the powerful Angular Material library.
Before we begin, make sure you have a working Angular 15 application set up on your machine. Additionally, ensure that you have the necessary dependencies installed, including Angular Material and its corresponding CSS styles.
To add Angular Material to your project, run the following command in your terminal.
npm install @angular/material@15 @angular/cdk@15
In the component file (app.module.ts), import the required Angular Material modules.
import { NgModule } from '@angular/core';

import { BrowserModule } from '@angular/platform-browser';

import { AppComponent } from './app.component';

import { BrowserAnimationsModule } from '@angular/platform-browser/animations';

import { MatDatepickerModule } from '@angular/material/datepicker';

import { MatNativeDateModule } from '@angular/material/core';

import { MatFormFieldModule } from '@angular/material/form-field';

import { ReactiveFormsModule } from '@angular/forms';


@NgModule({

  declarations: [

    AppComponent

  ],

    imports:      [

    BrowserModule,

    BrowserAnimationsModule,

    MatDatepickerModule,

    MatNativeDateModule,

    MatFormFieldModule,

    ReactiveFormsModule ],

  providers: [],

  bootstrap: [AppComponent]

})

export class AppModule { }
Create a new component that will contain your datepicker. For example, you can create a DatepickerComponent using the Angular CLI.
ng generate component Datepicker
In your DatepickerComponent template file, add the datepicker component and modify its start date.
<div class="container" style="margin:70px;">
	<h2>How To Change Datepicker Start Date In Angular 15 Material - Websolutionstuff</h2>
	<mat-form-field appearance="fill">
		<mat-label>Choose a date</mat-label>
		<input matInput [matDatepicker]="picker">
		<mat-hint>MM/DD/YYYY</mat-hint>
		<mat-datepicker-toggle matIconSuffix [for]="picker"></mat-datepicker-toggle>
		<mat-datepicker #picker startView="year" [startAt]="startDate"></mat-datepicker>
	</mat-form-field>
</div>
In your DatepickerComponent class file, define the customStartDate property and assign it the desired start date.
import {Component} from '@angular/core';
import {MatDatepickerModule} from '@angular/material/datepicker';
import {MatFormFieldModule} from '@angular/material/form-field';
import {MatNativeDateModule} from '@angular/material/core';

/** @title Datepicker start date */
@Component({
  selector: 'app-datepicker',
  templateUrl: 'datepicker.component.html',
  standalone: true,
  imports: [MatFormFieldModule, MatDatepickerModule, MatNativeDateModule],
})
export class DatepickerComponent {
  startDate = new Date(1990, 0, 1);
}
Start the Angular development server using the ng serve command and open the app in your browser.
ng serve
Output:
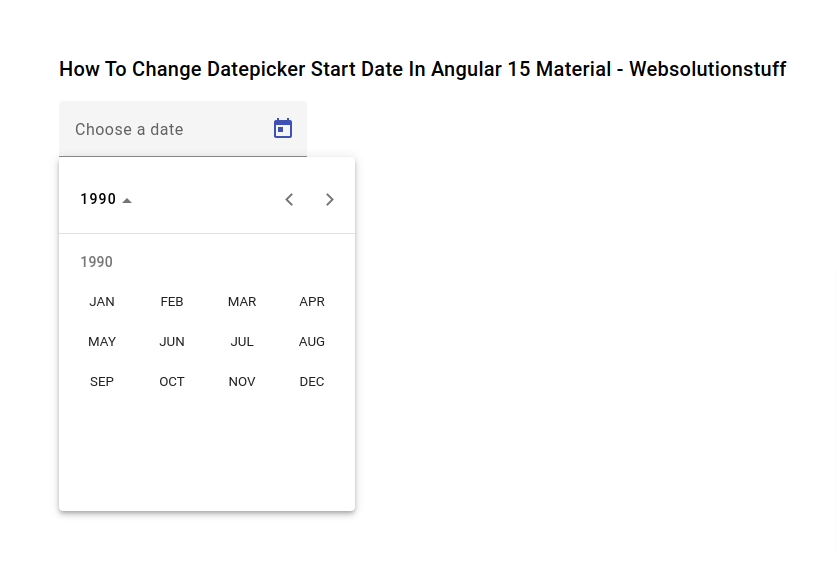
By following this step-by-step guide, you have learned how to change the start date of a datepicker component in Angular 15. Customizing the start date allows you to control the initial date displayed to users and align it with your application's specific requirements.
You might also like:
- Read Also: How To Add Datepicker In Angular 15 Material
- Read Also: How To Add Datepicker In Angular 15 Material
- Read Also: Boosting Angular 15 Performance: Tips & Tricks
- Read Also: How To Create Dynamic Bar Chart In Laravel
Recommended Post
Featured Post

Laravel 9 Ajax File Upload Wit...
In this article, we will see the laravel 9 ajax file upload with a progress bar. we will learn how to file upload using...
Nov-15-2022

How To Check RAM And CPU Usage...
In this tutorial, I will show you how to check RAM and CPU usage in laravel in ubuntu OS. Many times we requir...
Jul-29-2020

How To Create List And Grid Vi...
In this article, we will see how to create a list and grid view using javascript. many times clients have requirements l...
Dec-23-2020

Laravel 9 Autocomplete Search...
In this article, we will see laravel 9 autocomplete search from the database. Using ajax autocomplete textbox in la...
Mar-14-2022