How To Add Datepicker In Angular 15 Material
Websolutionstuff | Jun-28-2023 | Categories : Angular
In this tutorial, I will guide you through the process of adding a datepicker component to your Angular 15 application using Angular Material. The datepicker is a crucial element that allows users to select dates efficiently and provides a user-friendly experience.
By leveraging the powerful features of Angular Material, we can easily incorporate a datepicker into our application and enhance the user interface.
As we dive into each section of this tutorial, you will learn step-by-step how to integrate the datepicker component into your Angular 15 application.
We will cover everything from installation to customization and event handling. By the end of this tutorial, you will have a solid understanding of how to add a datepicker using Angular Material and be able to apply this knowledge to your own projects.
Table of Contents:
- Prerequisites
- Install Angular Material
- Import Angular Material Modules
- Add Datepicker Component
- Run Angular Application
- Conclusion
So, let's get started and explore how to add a datepicker in Angular 15 using the powerful Angular Material library.
Before we begin, ensure that you have a working Angular 15 application set up on your machine. Additionally, make sure you have the necessary dependencies installed, including Angular Material and its corresponding CSS styles.
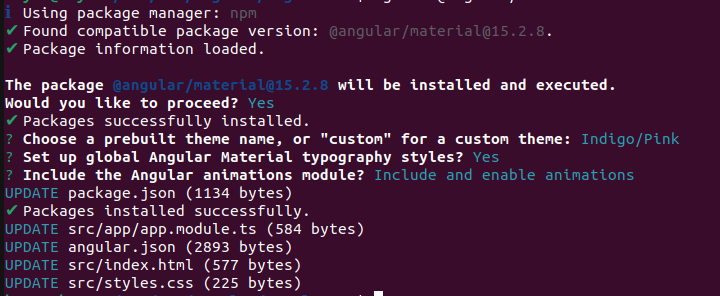
To add Angular Material to your project, run the following command in your terminal:
npm install @angular/material@15 @angular/cdk@15
Check the below screenshot.
Import the required Angular Material modules in your application's module file (app.module.ts):
import { NgModule } from '@angular/core';

import { BrowserModule } from '@angular/platform-browser';

import { AppComponent } from './app.component';

import { BrowserAnimationsModule } from '@angular/platform-browser/animations';

import { MatDatepickerModule } from '@angular/material/datepicker';

import { MatNativeDateModule } from '@angular/material/core';

import { MatFormFieldModule } from '@angular/material/form-field';

import { MatInputModule } from '@angular/material/input';


@NgModule({

   declarations: [

      AppComponent

   ],

   imports:      [

    BrowserModule,

    BrowserAnimationsModule,

    MatDatepickerModule,

    MatNativeDateModule,

    MatFormFieldModule,

    MatInputModule

  ],

  providers: [],

  bootstrap: [AppComponent]

})

export class AppModule { }
Ensure that you also import the necessary Angular Material CDK modules.
In your desired component template file, add the datepicker component:
src/app/app.component.html
<div class="container">
	<h1>How To Add Datepicker In Angular 15 Material - Websolutionstuff</h1>

	<mat-form-field>
	<input matInput [matDatepicker]="picker" placeholder="Choose a date">
	<mat-datepicker-toggle matSuffix [for]="picker"></mat-datepicker-toggle>
	<mat-datepicker #picker ></mat-datepicker>
	</mat-form-field>
</div>
Output:

Start the Angular development server using the ng serve command and open the app in your browser.
ng serve
By following this step-by-step guide, you have successfully added a datepicker component to your Angular 15 application using Angular Material. The datepicker component enhances user interactions and improves the overall user experience when working with date-related inputs.
Experiment with the datepicker's additional features, such as range selection and localization, to tailor it to your application's specific needs.
You might also like:
Recommended Post
Featured Post

Date Range Filter In Datatable...
In this article, we will see the date range filter in the datatable jquery example. Many times we required data of ...
Nov-14-2022

How to Convert UTC Time to Loc...
As a Laravel developer, working with time zones is a common requirement, especially when dealing with global application...
Mar-11-2024

How to Convert UTC Time to Loc...
Hello, laravel web developers! In this article, we'll see how to convert UTC time to local time in laravel 11. Here,...
Jul-03-2024

How To Use Sweetalert2 In Lara...
Today we will learn how to use sweetalert2 In laravel, You can use sweetalert2 in laravel as well as php, ...
May-03-2021