How To Restrict User Access From IP Address In Laravel 9
Websolutionstuff | Jan-03-2023 | Categories : Laravel
Imagine this: You've made a super cool website, and now you want to make sure only the right people can use it. That's where the IP address trick comes in!
In this article, we're like digital detectives exploring Laravel 9. We're going to learn how to control who can use your website based on their IP addresses.
Together, we'll go through each step. By the end, you'll know how to keep your website safe, make it more secure, and let only the people you want use it.
Step 1: Install Laravel 9 Application
Step 2: Create Middleware
Step 3: Register Middleware
Step 4: Use Middleware
Step 5: Run Laravel Application
In this step, we will install the laravel 9 application using the following command.
composer create-project laravel/laravel laravel_9_IP_Address
Now, we will create a BlockIPAddressMiddleware file using the following command.
php artisan make:middleware BlockIPAddressMiddleware
Now, open the app/Http/Middleware/BlockIPAddressMiddleware.php file and update the below code.
<?php
namespace App\Http\Middleware;
use Closure;
use Illuminate\Http\Request;
class BlockIPAddressMiddleware
{
public $blockIPs = ['Block-IP-1', 'Block-IP-2', 'Block-IP-3'];
/**
* Handle an incoming request.
*
* @param \Illuminate\Http\Request $request
* @param \Closure(\Illuminate\Http\Request): (\Illuminate\Http\Response|\Illuminate\Http\RedirectResponse) $next
* @return \Illuminate\Http\Response|\Illuminate\Http\RedirectResponse
*/
public function handle(Request $request, Closure $next)
{
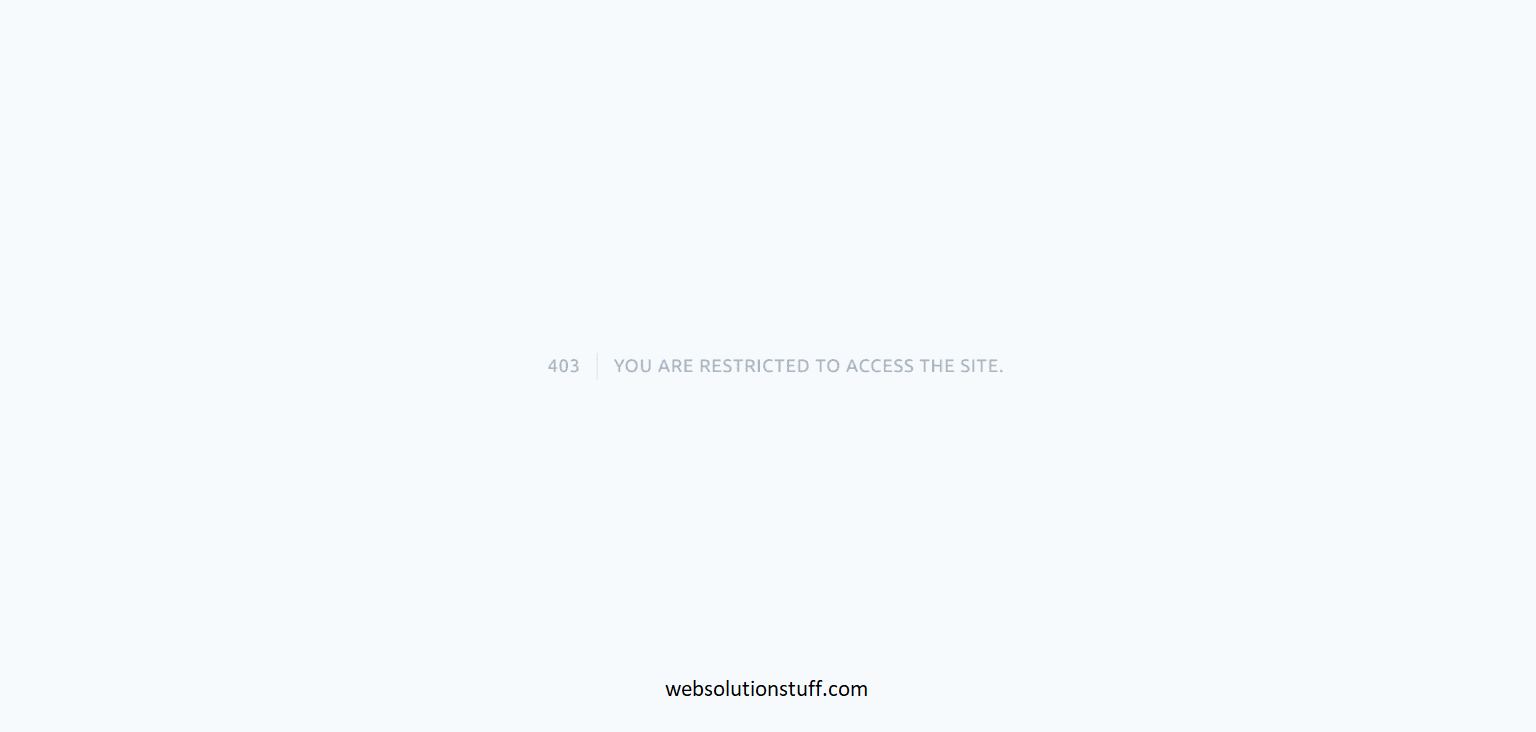
if (in_array($request->ip(), $this->blockIPs)) {
abort(403, "You are restricted to access the site.");
}
return $next($request);
}
}
In this step, we will register the middleware file to the kernel.php file. So, add the following code to that file.
app/Http/Kernel.php
<?php

namespace App\Http;

use Illuminate\Foundation\Http\Kernel as HttpKernel;

class Kernel extends HttpKernel
{
    ....

    /**
     * The application's route middleware.
     *
     * These middleware may be assigned to groups or used individually.
     *
     * @var array
     */
    protected $routeMiddleware = [
        ....
        'blockIPAddress' => \App\Http\Middleware\BlockIPAddressMiddleware::class,
    ];
}
Now, we will use the BlockIPAddressMiddleware in the route file. So, update the web.php file.
routes/web.php
<?php

use Illuminate\Support\Facades\Route;
use App\Http\Controllers\UserController;
use App\Http\Controllers\PostController;

/*
|--------------------------------------------------------------------------
| Web Routes
|--------------------------------------------------------------------------
|
| Here is where you can register web routes for your application. These
| routes are loaded by the RouteServiceProvider within a group which
| contains the "web" middleware group. Now create something great!
|
*/

Route::middleware(['blockIPAddress'])->group(function () {
    Route::resource('users', UserController::class);
    Route::resource('post', PostController::class);
});
Now, run the laravel 9 restrict user access from the IP address using the following command.
php artisan serve
Output:
Restricting user access based on IP addresses in Laravel 9 offers heightened security and control to your web application. By implementing these steps, you empower yourself to safeguard sensitive data and confidential information effectively.
With our guide, you're now equipped to protect your digital domain against unauthorized access. As the digital landscape continues to evolve, this method remains a pivotal tool for maintaining the integrity of your online platform.
You might also like:
- Read Also: How To Get Client IP Address In Laravel 9
- Read Also: Laravel 9 Create Middleware For XSS Protection
- Read Also: Laravel 9 Multiple Authentication Using Middleware
- Read Also: Laravel 9 Multiple Authentication Using Middleware
Recommended Post
Featured Post

CRUD Operation In PHP
In this tutorial, I will show you how to create a CRUD operation with login-logout in PHP. So, if you are a newcomer in...
Jul-20-2020

Top 20 Best Javascript Tips an...
Welcome to the fascinating world of JavaScript, where innovation and creativity converge to deliver dynamic and interact...
Aug-14-2023

Helper Function Example in Lar...
Hello All, In this post we will see helper function example in laravel, Laravel provide in-buit global "hel...
Jun-22-2021

StartOf And EndOf Functions Ex...
In this article, we will see startof and endof functions example of carbon in laravel. As you all know carbon provide ma...
Dec-19-2020