Laravel 8 Socialite Login with Google Account
Websolutionstuff | Dec-01-2020 | Categories : Laravel PHP
In this article, we will see laravel 8 socialite login with a google account. This post gives you an example of a laravel 8 socialite login with a google account and also you can gain knowledge about how to socialite log in with a google account in laravel 8 jetstreams.
Now a day's you can see different types of social logins like Gmail, Facebook, GitHub, etc. because now users can't fill sign up or sign-in forms and waste their time in form filling. So, this type of feature in the website adds and get more user on the website.
So, let's see socialite login with google in laravel 8 and laravel 7 socialite login with google.
How To Login With Google In Laravel 8
In this step, we will install laravel 8 for this laravel 8 socialite login with a google account.
composer create-project --prefer-dist laravel/laravel laravel_8_google_login
In this step, we will install jetstream. So, run the below command to install jetstream.
composer require laravel/jetstream
Now, we need to install livewire using the below artisan command and also we need basic authentication like login and registration.
php artisan jetstream:install livewire
Now, Install Node and run the package.
npm install
npm run dev
Now, we will create a database using the migration command.
php artisan migrate
Now, we will install the socialite package which provides API to connect with a google account. So, run the below command.
composer require laravel/socialite
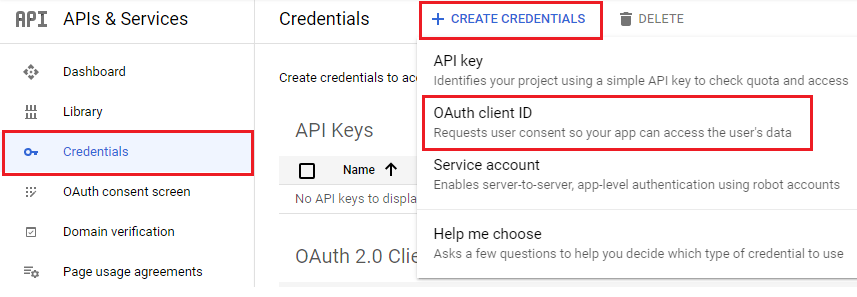
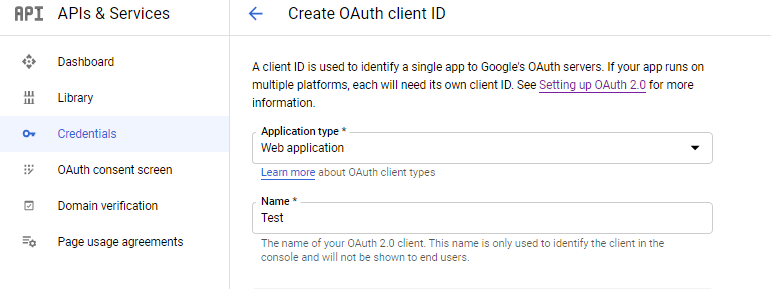
Now, we required a google client id and secret key, if you don't have a google app account then you need to create it from the given link Google Developers Console.
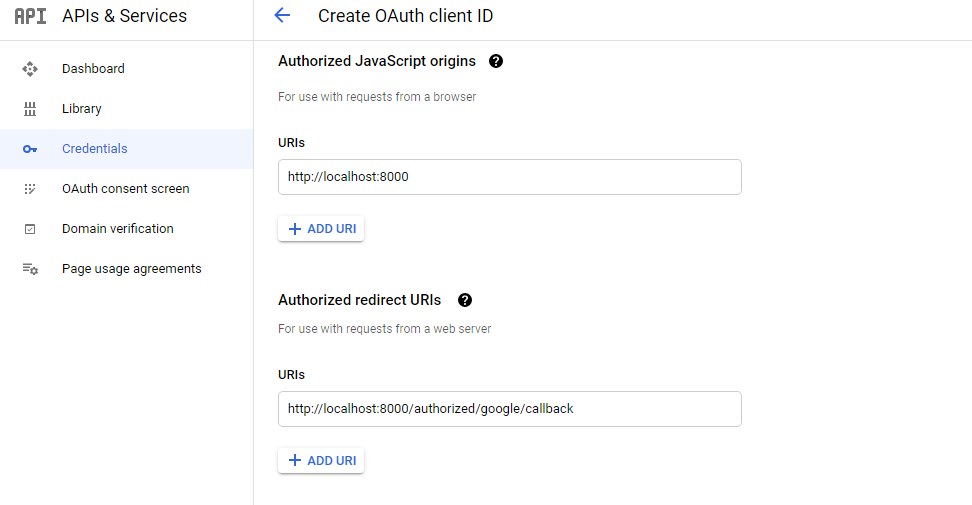
After the configuration of the google app, we will set the app id, and secret key and call back the URL in the config file.
config/services.php
'google' => [
        'client_id' => 'your client id',
        'client_secret' => 'your client secret key',
        'redirect' => 'http://localhost:8000/authorized/google/callback',
],
Now, run the below command to add the google id column in the user table.
php artisan make:migration add_google_id_to_users_table
<?php

use Illuminate\Database\Migrations\Migration;
use Illuminate\Database\Schema\Blueprint;
use Illuminate\Support\Facades\Schema;

class AddGoogleIdToUsersTable extends Migration
{
    public function up()
    {
        Schema::table('users', function (Blueprint $table) {
            $table->string('google_id')->nullable();
        });
    }

    public function down()
    {
        Schema::table('users', function (Blueprint $table) {
            $table->dropColumn('google_id');
        });
    }
}
Add the below code in the User model.
<?php

namespace App\Models;

use Illuminate\Database\Eloquent\Factories\HasFactory;
use Illuminate\Foundation\Auth\User as Authenticatable;
use Illuminate\Notifications\Notifiable;
use Laravel\Fortify\TwoFactorAuthenticatable;
use Laravel\Jetstream\HasProfilePhoto;
use Laravel\Jetstream\HasTeams;
use Laravel\Sanctum\HasApiTokens;

class User extends Authenticatable
{
    use HasApiTokens;
    use HasFactory;
    use HasProfilePhoto;
    use HasTeams;
    use Notifiable;
    use TwoFactorAuthenticatable;

    protected $fillable = [
        'name', 'email', 'password', 'google_id',
    ];

    protected $hidden = [
        'password',
        'remember_token',
        'two_factor_recovery_codes',
        'two_factor_secret',
    ];

    protected $casts = [
        'email_verified_at' => 'datetime',
    ];

    protected $appends = [
        'profile_photo_url',
    ];
}
Now, create a new route in the web.php file.
routes/web.php
<?php

use Illuminate\Support\Facades\Route;
use App\Http\Controllers\LoginWithGoogleController;

Route::get('authorized/google', [LoginWithGoogleController::class, 'redirectToGoogle']);
Route::get('authorized/google/callback', [LoginWithGoogleController::class, 'handleGoogleCallback']);
In this step, we will create a new controller for laravel 8 socialite login with google and the name as LoginWithGoogleController.
<?php

namespace App\Http\Controllers;

use Illuminate\Http\Request;
use Laravel\Socialite\Facades\Socialite;
use App\Models\User;
use Illuminate\Support\Facades\Auth;
use Exception;

class LoginWithGoogleController extends Controller
{
     public function redirectToGoogle()
    {
        return Socialite::driver('google')->redirect();
    }

    public function handleGoogleCallback()
    {
        try {

            $user = Socialite::driver('google')->user();

            $finduser = User::where('google_id', $user->id)->first();

            if($finduser){

                Auth::login($finduser);

                return redirect()->intended('dashboard');

            }else{
                $newUser = User::create([
                    'name' => $user->name,
                    'email' => $user->email,
                    'google_id'=> $user->id,
                    'password' => encrypt('123456dummy')
                ]);

                Auth::login($newUser);

                return redirect()->intended('dashboard');
            }

        } catch (Exception $e) {
            dd($e->getMessage());
        }
    }
}
In this step, we will edit the login blade in the below code example.
<x-guest-layout>
    <x-jet-authentication-card>
        <x-slot name="logo">
            <x-jet-authentication-card-logo />
        </x-slot>

        <x-jet-validation-errors class="mb-4" />

        @if (session('status'))
            <div class="mb-4 font-medium text-sm text-green-600">
                {{ session('status') }}
            </div>
        @endif

        <form method="POST" action="{{ route('login') }}">
            @csrf

            <div>
                <x-jet-label for="email" value="{{ __('Email') }}" />
                <x-jet-input id="email" class="block mt-1 w-full" type="email" name="email" :value="old('email')" required autofocus />
            </div>

            <div class="mt-4">
                <x-jet-label for="password" value="{{ __('Password') }}" />
                <x-jet-input id="password" class="block mt-1 w-full" type="password" name="password" required autocomplete="current-password" />
            </div>

            <div class="block mt-4">
                <label for="remember_me" class="flex items-center">
                    <input id="remember_me" type="checkbox" class="form-checkbox" name="remember">
                    <span class="ml-2 text-sm text-gray-600">{{ __('Remember me') }}</span>
                </label>
            </div>

            <div class="flex items-center justify-end mt-4">
                @if (Route::has('password.request'))
                    <a class="underline text-sm text-gray-600 hover:text-gray-900" href="{{ route('password.request') }}">
                        {{ __('Forgot your password?') }}
                    </a>
                @endif

                <x-jet-button class="ml-4">
                    {{ __('Login') }}
                </x-jet-button>
            </div>
            <div class="flex items-center justify-end mt-4">
                <a href="{{ url('authorized/google') }}">
                    <img src="https://developers.google.com/identity/images/btn_google_signin_dark_normal_web.png" style="margin-left: 3em;">
                </a>
            </div>
        </form>
    </x-jet-authentication-card>
</x-guest-layout>
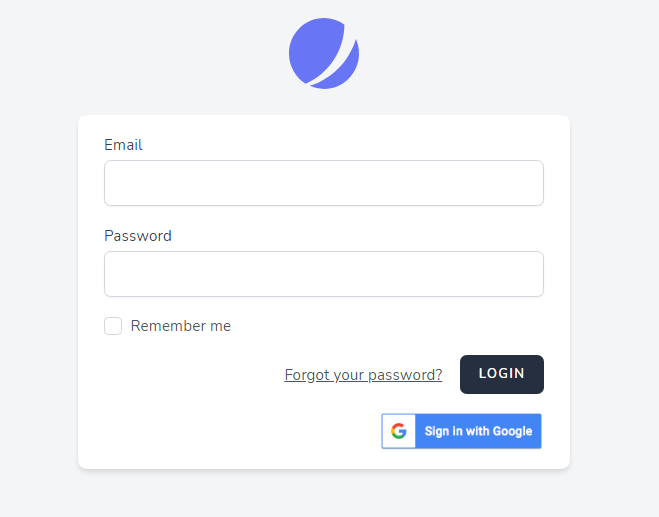
Output:
You might also like:
- Read Also: Stripe Payment Gateway Integration Example In Laravel 8
- Read Also: Laravel 9 Socialite Login with Facebook Account
- Read Also: Laravel 8 Socialite Login With GitHub Account
- Read Also: Character Count In Textarea
Recommended Post
Featured Post

Laravel 8 Inner Join Query Exa...
In this tutorial we will learn about laravel 8 inner join query example. Also see how to join two tables in laravel 8. I...
Nov-24-2021

How to File Upload in Laravel...
Hello, laravel web developers! In this article, we'll see how to file upload in laravel 11 Livewire. Here, we'll...
Jun-10-2024

Google Recaptcha Example In La...
In this tutorial I will teach you about Google Recaptcha, Google Recaptcha is used for advanced risk analysis...
Jun-10-2020

Laravel 10 AJAX CRUD Operation...
In this article, we will see the laravel 10 ajax crud operations example. Here, we will learn about ajax crud operation...
Feb-27-2023