Mastering Reactive Forms Validation in Angular 15
Websolutionstuff | Jun-14-2023 | Categories : Angular
Welcome to "Mastering Reactive Forms Validation in Angular 15: A Comprehensive Guide." In this guide, we will dive deep into the world of Reactive Forms validation in Angular 15, equipping you with the knowledge and skills to handle form validation effectively in your web applications.
Form validation plays a crucial role in ensuring data integrity and providing a seamless user experience. With Reactive Forms, I can create dynamic and interactive forms with ease. By harnessing the power of Reactive Forms, we can implement robust validation rules, handle validation errors, and enhance the overall user experience.
Throughout this comprehensive guide, we will explore the fundamentals of Reactive Forms, including form groups, form controls, and form submission. I will delve into the wide range of built-in validators provided by Angular 15, allowing you to validate input fields for common scenarios. Additionally, I will show you how to create custom validators to cater to unique validation requirements specific to your application.
Asynchronous validation is another essential aspect we will cover, enabling you to perform validations that involve asynchronous operations, such as making HTTP requests. You will gain insights into displaying validation errors effectively to guide users in correcting their input. Moreover, we will discuss various form validation strategies, including cross-field validation and validating the entire form.
To take your skills to the next level, we will explore advanced techniques and best practices for form validation in Angular 15. You will learn how to implement dynamic validation based on user input changes, handle form reset and pristine state, and seamlessly integrate with third-party validation libraries.
By the end of this guide, you will be equipped with a comprehensive understanding of Reactive Forms validation in Angular 15. Whether you are a beginner or an experienced Angular developer, this guide will empower you to create robust and user-friendly web applications by mastering the art of form validation.
Let's embark on this exciting journey together and unlock the full potential of Reactive Forms validation in Angular 15.
Form validation is a fundamental aspect of building web applications that require user input. It ensures that the data submitted through forms meets the specified criteria, maintaining data integrity and providing a seamless user experience. In this section, we will explore the essentials of form validation in Angular 15's Reactive Forms.
Here's a code example that demonstrates the Form Validation Basics in Angular 15's Reactive Forms.
In this step, we will install new angular application using the following command.
ng new my-new-app
In this file, import the necessary modules.
src/app/app.module.ts
import { NgModule } from '@angular/core';
import { BrowserModule } from '@angular/platform-browser';

import { AppRoutingModule } from './app-routing.module';
import { AppComponent } from './app.component';
import { FormsModule, ReactiveFormsModule } from '@angular/forms';

@NgModule({
  declarations: [
    AppComponent
  ],
  imports: [
    BrowserModule,
    AppRoutingModule,
	ReactiveFormsModule
  ],
  providers: [],
  bootstrap: [AppComponent]
})
export class AppModule { }
In the component template file (app.component.html), create the form template. Bind the form group and form controls to the respective HTML elements using the formGroup and formControlName directives.
src/app/app.component.html
<div class="container mt-5">
	<div class="card">
		<div class="card-header">
			<strong>Angular 15 Forms Validation Example - Websolutionstuff</strong>
		</div>
		<div class="card-body">
			<form [formGroup]="form" (ngSubmit)="submit()">
				<div class="form-group">
					<label for="name">Name</label>
					<input formControlName="name" id="name" type="text" class="form-control">
					<div *ngIf="f['name'].touched && f['name'].invalid" class="alert alert-danger mt-1">
						<div *ngIf="f['name'].errors && f['name'].errors['required']">Name is required.</div>
						<div *ngIf="f['name'].errors && f['name'].errors['minlength']">Name should be 3 character.</div>
					</div>
				</div>

				<div class="form-group mt-1">
					<label for="email">Email</label>
					<input formControlName="email" id="email" type="text" class="form-control">
					<div *ngIf="f['email'].touched && f['email'].invalid" class="alert alert-danger mt-1">
						<div *ngIf="f['email'].errors && f['email'].errors['required']">Email is required.</div>
						<div *ngIf="f['email'].errors && f['email'].errors['email']">Please, enter valid email address.</div>
					</div>
				</div>

				<div class="form-group mt-1">
					<label for="body">Body</label>
					<textarea formControlName="body" id="body" type="text" class="form-control">
					</textarea>
					<div *ngIf="f['body'].touched && f['body'].invalid" class="alert alert-danger mt-1">
						<div *ngIf="f['body'].errors && f['body'].errors['required']">Body is required.</div>
					</div>
				</div>

				<button class="btn btn-primary mt-2" [disabled]="form.invalid" type="submit">Submit</button>
			</form>
		</div>
	</div>
</div>
In the component class, implement the submitForm() method to handle the form submission.
import { Component } from '@angular/core';
import { FormGroup, FormControl, Validators} from '@angular/forms';

@Component({
  selector: 'app-root',
  templateUrl: './app.component.html',
  styleUrls: ['./app.component.css']
})
export class AppComponent {

  form = new FormGroup({
    name: new FormControl('', [Validators.required, Validators.minLength(3)]),
    email: new FormControl('', [Validators.required, Validators.email]),
    body: new FormControl('', Validators.required)
  });

  get f(){
    return this.form.controls;
  }

  submit(){
    console.log(this.form.value);
  }

}
Test the form validation by running the Angular application.
ng serve
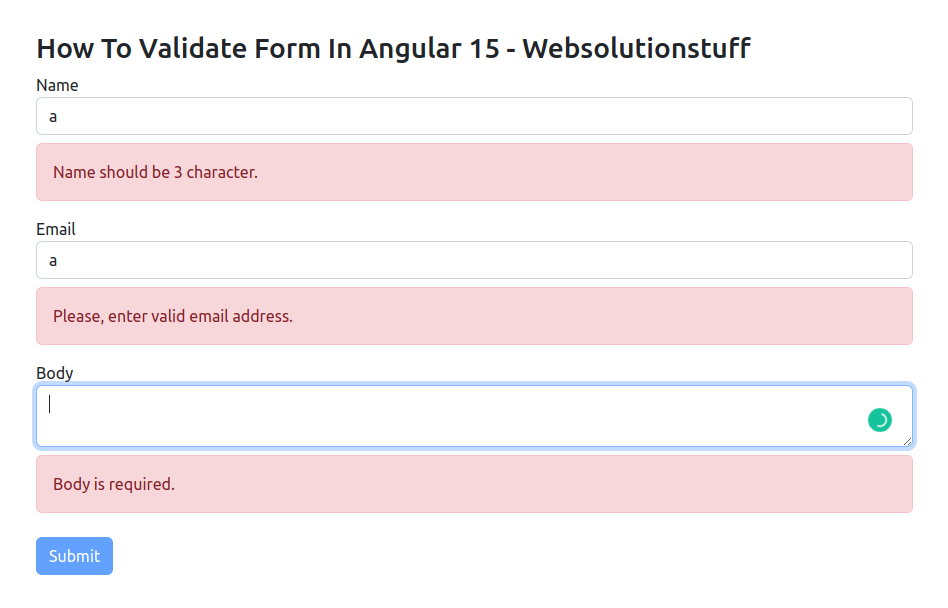
Open the application in a browser and interact with the form to see the validation in action.
By following these step-by-step instructions, you can implement form validation using Reactive Forms in Angular 15. Customize the validators and validation messages based on your specific requirements to ensure data integrity and enhance the user experience in your web application.
Output:
You might also like:
- Read Also: Adding Bootstrap 5 To Angular 15: Step-by-Step Guide
- Read Also: How To Create Validation Rule In Laravel 10
- Read Also: Laravel 10 AJAX Form Validation Example
- Read Also: File Upload With Progress Bar In Angular 13
Recommended Post
Featured Post

How To Validate URL In PHP Wit...
Hello Guys, In this tutorial we will see how to validate URL in PHP with regex. also you can implement in larave...
Apr-13-2021

Laravel 9 Refresh DataTable Wi...
In this article, we will see laravel 9 refresh datatable without reloading the page. When I have a data table that...
May-01-2022

How To Create Custom Command I...
In this article, we will see how to create a custom command in laravel 9. Here we will learn about how to make cust...
Feb-14-2023

How To Change Datepicker Color...
In this tutorial, I will guide you through the process of changing the color of a datepicker component in Angular 15 Mat...
Jul-05-2023