Getting Started with Laravel in CodeLobster IDE
Websolutionstuff | Jan-16-2022 | Categories : Laravel Other
Laravel is probably one of the most promoted PHP frameworks at the moment. It has a huge team and an excellent knowledge base - many articles, video tutorials and detailed documentation.
Professional programmers use it widely in their projects, so beginners also need to learn Laravel as soon as possible.
Codelobster helps you to make a local Laravel installation quickly and effortlessly. There is no need to use the command line or download and run VirtualBox and Homestead virtual machine, which is larger than 2 GB.
For the work we need our IDE and the latest version of XAMPP, which in all respects is suitable for the correct operation of the newest version of the framework. This article uses XAMPP 7.2.12, and we recommend that you install it too.
Launch CodeLobster and go to the main menu "Tools"->"Preferences"->"PHP". Specify the path to the executable file "php.exe", in our system, for example, it looks like this - "D:/xampp-7.2.12/php/php.exe".
Check "php.ini" file and make sure you have enabled all the necessary PHP-extensions such as php_bz2, php_curl, php_fileinfo, php_gd2, php_gettext, php_mbstring, php_exif, php_mysqli, php_pdo_mysql, php_pdo_sqlite, php_openssl and php_ftp.
Now everything is ready, let's run MySQL and Apache servers and start the main work.
Go to the main menu "Project"->"Create Project".
In the dialog box that appears, select the type of the created project "Create Empty Laravel Project".
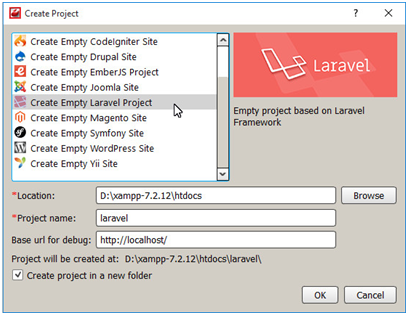
Specify the project name, which we will place in the "htdocs" folder in the directory with the installed XAMPP.
Enable the option "Create project in a new folder" and click "OK" to start the wizard to install the framework.
We have to complete a few steps and enter the elementary settings.
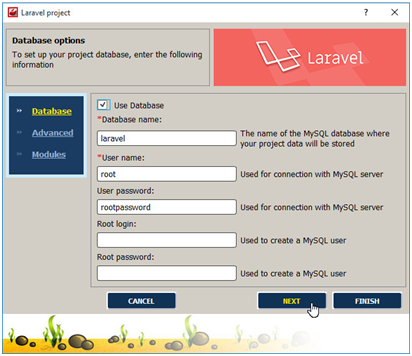
To connect the system to an existing database, select the "Use Database" checkbox and enter DB name, username and password.
In the next dialog box, enter the server name and port. If MySQL is running on the local computer, then nothing needs to be changed at this stage.
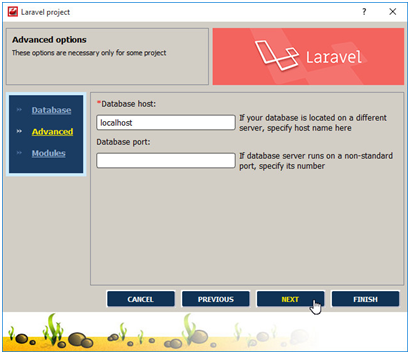
All data entered by us will be automatically saved in the "config/database.php" file, and later it can be changed manually simply by opening this file in the editor.
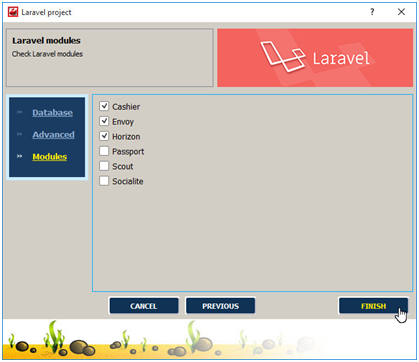
At the next dialog, we have got an ability to choose additional official packages for the installation:
- Cashier - it provides an interface for working with Stripe and Braintree services for organizing an online payment system on the site.
- Envoy - a package for organizing the execution of various tasks on a remote server, this may be the execution of PHP code or the launch of macros with several sequential commands.
- Horizon - it provides a control panel and an API for accessing the Redis queue service, this ensures faster operation of WEB applications.
- Passport - it provides advanced features for user authentication using the API, fully implements the OAuth2 authorization system.
- Scout - it implements the synchronization of your search index with the records in the model for working with the database and provides the ability to perform full-text search.
- Socialite - it allows OAuth authentication, so you can use the login with Google, Facebook, Twitter, LinkedIn, GitHub, GitLab and Bitbucket.
Such tools will help in the work on large-scale projects, if you are just starting to learn the framework, you can skip this step for now.
Click "Finish" and wait a little while CodeLobster downloads the current version of the framework and unpacks it into the designated directory.
When the wizard has finished its work, we will check the correctness of the installation - open the address "http://localhost/laravel/public/" in your browser, it is in this folder the public files are stored.

As you can see, the Laravel logo appeared, there are no error messages, which means everything is well.
We can study the structure of the new project on the "Project" tab, and also edit the main settings of our WEB-application.
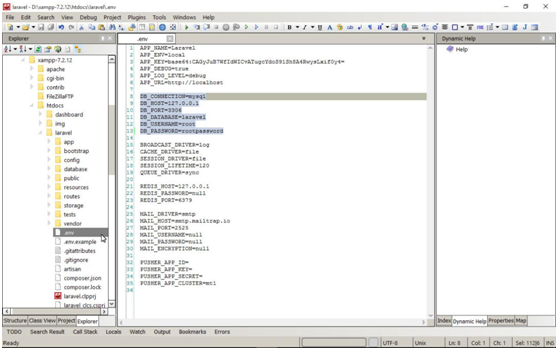
If you are using a database connection, go to the file explorer in the left pane of the IDE and open the ".env" file in the editor, this file stores the environment variables.
Find the line "DB_CONNECTION=mysql" and enter the parameters for connecting to MySQL. In our example, this fragment looks like this:
DB_CONNECTION=mysql
DB_HOST=127.0.0.1
DB_PORT=3306
DB_DATABASE=laravel
DB_USERNAME=root
DB_PASSWORD=rootpassword
Laravel includes an object-relational mapping (ORM) system, it is called Eloquent and is an implementation of the Active Record design pattern (AR).
The rules for naming classes, tables and their fields are used in order to unify ways of connecting objects and their corresponding tables and rows in the DB.
In the database that we have connected to the current installation, there is a ready-made table on which we can practice.
The name of the table is "countries", it contains the names of countries and phone codes - these are the "name" and "phonecode" fields.
To use Eloquent, you need to create your own class that extends the "Model" class. Create a file "Country.php" in the "app" folder and add the following lines to it:
<?php
namespace App;
use Illuminate\Database\Eloquent\Model;
class Country extends Model {}
According to the naming rules, a class called "Country" (in the singular) will represent entries in the table "countries". This is quite enough for now, the rest of the work for us will be done by the framework.
To take advantage of the model for the data access, let's create a router - we will link the URL "http://localhost/laravel/public/countries" to the function of extracting records from the table.
Routers for your WEB applications are stored in the "routes" folder, open the "web.php" file in the editor and add a few lines of your own code to it:
Route::get('/countries', function () {
    $countries = App\Country::all();
    $html = '<ul>';
    foreach ($countries as $country) {
      $html .= '<li>' . $country->name . '</li>';
    }
    return $html .= '</ul>';
});
The IDE understands the structure of the Laravel project very well and provides hints and dynamic help on all the functions and classes included in the framework.
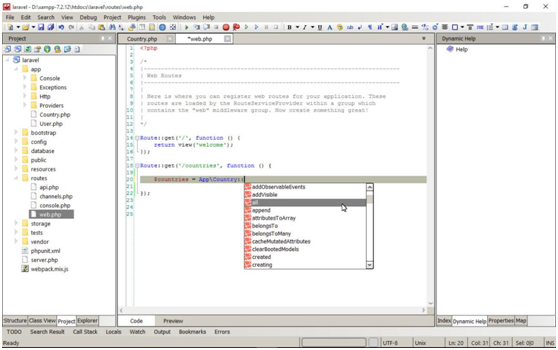
It will be much easier for you to use all its advantages if you use autocomplete while typing by pressing the Ctrl + Space key combination to get the list of methods that are allowed in this context.
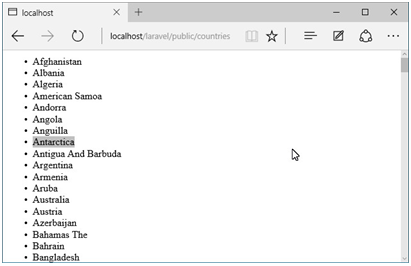
When we execute our code, an array with information about countries will be extracted, it can now be passed to the view for formatting and display.
In our educational example, we simply select the names of the countries and create an HTML list, and it will be displayed using the default view.
Open the address "http://localhost/laravel/public/countries" in the browser and see an accurate list with the names of all countries from our database.
Let's summarize
In this article, we have learned how to quickly create a new project and install Laravel using the wizard in CodeLobster IDE.
This is a universal approach - it is suitable for any operating system and does not require the use of the command line or the installation of additional software.
The principle of operation of all MVC and ORM frameworks is the same. After reading this article, you have learned the basic steps to get started with Laravel, with this knowledge you will be able to easily and simply master other PHP libraries.
Recommended Post
Featured Post

How To Remove Column From Tabl...
In this article, we will see how to remove columns from a table in laravel 10 migration. Here, we will learn about...
Apr-26-2023

Laravel 9 Barcode Generator Ex...
In this article, we will see laravel 9 barcode generator example. In this example we will use the milon/barcod...
Mar-26-2022
 and str() Helper Function")
Laravel 9 to_route() and str()...
In this article, we will see laravel 9 to_route() and str() helper function. The to_route function g...
Oct-03-2022

How to Download File on the FT...
Today we will see how to download file on the ftp server using php. Many time we have requirment to retrieve file from t...
May-21-2021