How To Generate Barcode In Laravel
Websolutionstuff | Jun-06-2020 | Categories : Laravel PHP
In this tutorial, I will show you how to generate barcodes using the milon/barcode package. In this example, we will use milon/
Let's see how to generate barcodes in laravel on 6/7/8. laravel barcode generator example, how to create barcode in laravel, barcode generator laravel 7, laravel 6/7/8 barcode generator.
So, let's start and follow the below step to get the output.
Step 1 : Install Laravel
Type the following command in the terminal to create a new project in your system.
composer create-project --prefer-dist laravel/laravel barcode
Step 2 : Install milon/barcode Package In Your Application
After installation of the project, you need to install milon/
composer require milon/barcode
Step 3 : Add Service Provider And Aliase
After package installation, we need to add service provider and aliase in config/app.php.
'providers' => [

	Milon\Barcode\BarcodeServiceProvider::class,
],

'aliases' => [

	'DNS1D' => Milon\Barcode\Facades\DNS1DFacade::class,
    'DNS2D' => Milon\Barcode\Facades\DNS2DFacade::class,
],
Step 4 : Create Controller
Now create a controller on this path app\Http\Controllers\BarcodeController.php and add the below command.
<?php

namespace App\Http\Controllers;

use Illuminate\Http\Request;

class BarcodeController extends Controller
{
    public function barcode()
	{
	    return view('barcode');
	}
}
Step 5 : Add Route
We need to add a route for generating barcodes and viewing files.
<?php

use Illuminate\Support\Facades\Route;

Route::get('barcode', 'BarcodeController@barcode');
Step 6 : Create Blade File
Now, create a barcode.blade.php file to generate Barcode in this path resources\views\barcode.blade.php and add the below HTML code.
<html>
	<head>
		<title>Barcode - Websolutionstuff</title>
		<link rel="stylesheet" href="https://maxcdn.bootstrapcdn.com/bootstrap/3.3.7/css/bootstrap.min.css">
	</head>
	<h1 class="text-primary" style="text-align: center;margin-bottom: 20px;">Laravel Barcode Generator - Websolutionstuff</h1>
	<div style="text-align: center;">
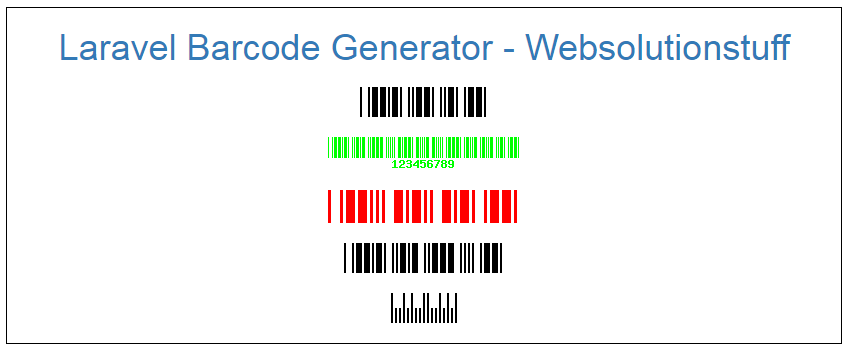
		<img src="data:image/png;base64,{{DNS1D::getBarcodePNG('11', 'C39')}}" alt="barcode" /><br><br>
		<img src="data:image/png;base64,{{DNS1D::getBarcodePNG('123456789', 'C39+',1,33,array(0,255,0), true)}}" alt="barcode" /><br><br>
		<img src="data:image/png;base64,{{DNS1D::getBarcodePNG('4', 'C39+',3,33,array(255,0,0))}}" alt="barcode" /><br><br>
		<img src="data:image/png;base64,{{DNS1D::getBarcodePNG('12', 'C39+')}}" alt="barcode" /><br><br>
		<img src="data:image/png;base64,{{DNS1D::getBarcodePNG('23', 'POSTNET')}}" alt="barcode" /><br/><br/>
	</div>
</html>
For more information about the barcode package: milon/barcode
So, Right now we are done with our code you can implement this example in your laravel application and you will get output like the below screen print.

You might also like :
- Read Also: How To Send Email using Node.js
- Read Also: Laravel 8 Custom Email Verification Tutorial
- Read Also: Laravel 8 Class NumberFormatter Not Found
- Read Also: Next Previous Link Button Pagination in Laravel
Recommended Post
Featured Post

How to Create Custom Facade in...
Laravel, one of the most popular PHP frameworks, provides a powerful feature known as facades. Facades allow you to acce...
Sep-22-2023

How To Install Python On Ubunt...
In this article, we will see how to install python on ubuntu. Python is a popular programming language. P...
May-06-2022

Crop Image Before Upload Using...
In this article, we will see how to crop images before uploading using the croppie plugin. any times we have requir...
Aug-15-2020

How To Disabled Submit Button...
In this article, we will see how to disabled submit button after clicked using jquery. Using jQuery we will disable the...
May-08-2022