How To Login With OTP In Laravel 10
Websolutionstuff | Aug-21-2023 | Categories : Laravel
In today's digital age, where security is paramount, user authentication has become a cornerstone concern for web application developers like myself. Laravel, a robust PHP framework that I frequently turn to, has continually evolved to meet the dynamic demands of the industry.
With the recent release of Laravel 10, I find myself equipped with even more powerful tools to enhance the security of user authentication in my applications.
Among the most dependable methods to fortify authentication security is the implementation of One-Time Passwords (OTPs). These OTPs add an extra layer of protection, ensuring that only authorized users can access sensitive information or perform crucial actions within an application.
In this article, I will guide you through the process of implementing OTP-based login functionality in Laravel 10, equipping you with the knowledge to safeguard your application against unauthorized access and potential security threats.
Throughout this comprehensive tutorial, I will cover every aspect of OTP-based login, from setting up the Laravel 10 environment to seamlessly integrating OTP generation and verification.
Whether I'm working on a financial application, an e-commerce platform, or any project where user data security is paramount, the insights I'm about to share will prove invaluable.
So, let's dive right in and explore how I can empower my Laravel 10 application with OTP-based authentication, ensuring that my users' accounts remain secure and protected.
If you haven't already, you can create a new Laravel project using Composer.
composer create-project laravel/laravel otp-login
cd otp-login
Laravel provides a built-in authentication scaffolding that you can install. This will create the necessary routes, views, and controllers for user authentication.
composer require laravel/ui
php artisan ui bootstrap --auth
To add a column, create a Migration using the following command.
php artisan make:migration add_mobile_no_in_users_table
Migration:
<?php

use Illuminate\Database\Migrations\Migration;
use Illuminate\Database\Schema\Blueprint;
use Illuminate\Support\Facades\Schema;

return new class extends Migration
{
    /**
     * Run the migrations.
     *
     * @return void
     */
    public function up()
    {
        Schema::table('users', function (Blueprint $table) {
            $table->string('mobile_no')->nullable()->after('username');
        });
    }

    /**
     * Reverse the migrations.
     *
     * @return void
     */
    public function down()
    {
        Schema::table('users', function (Blueprint $table) {
            $table->dropColumn('mobile_no');
        });
    }
};
Now run the migration by command, it will add the mobile number to the user's table.
php artisan migrate
Now Update the app/Http/Controllers/Auth/RegisterController.php to register a user with a mobile Number.
<?php

namespace App\Http\Controllers\Auth;

use App\Http\Controllers\Controller;
use App\Providers\RouteServiceProvider;
use App\Models\User;
use Illuminate\Foundation\Auth\RegistersUsers;
use Illuminate\Support\Facades\Hash;
use Illuminate\Support\Facades\Validator;

class RegisterController extends Controller
{

    use RegistersUsers;

    /**
     * Where to redirect users after registration.
     *
     * @var string
     */
    protected $redirectTo = RouteServiceProvider::HOME;

    /**
     * Create a new controller instance.
     *
     * @return void
     */
    public function __construct()
    {
        $this->middleware('guest');
    }

    /**
     * Get a validator for an incoming registration request.
     *
     * @param  array  $data
     * @return \Illuminate\Contracts\Validation\Validator
     */
    protected function validator(array $data)
    {
        return Validator::make($data, [
            'name' => ['required', 'string', 'max:255'],
            'username' => ['required', 'string', 'max:255'],
            'mobile_no' => ['required', 'number', 'max:10'],
            'email' => ['required', 'string', 'email', 'max:255', 'unique:users'],
            'password' => ['required', 'string', 'min:8', 'confirmed'],
        ]);
    }

    /**
     * Create a new user instance after a valid registration.
     *
     * @param  array  $data
     * @return \App\Models\User
     */
    protected function create(array $data)
    {
        return User::create([
            'name' => $data['name'],
            'username' => $data['username'],
            'mobile_no' => $data['mobile_no'],
            'email' => $data['email'],
            'password' => Hash::make($data['password']),
        ]);
    }
}
Next, update the resources/views/auth/register.blade.php file as below code example.
@extends('layouts.app')

@section('content')
<div class="container">
    <div class="row justify-content-center">
        <div class="col-md-8">
            <div class="card">
                <div class="card-header">How To Login With OTP In Laravel 10 - Websolutionstuff</div>

                <div class="card-body">
                    <form method="POST" action="{{ route('register') }}">
                        @csrf

                        <div class="row mb-3">
                            <label for="name" class="col-md-4 col-form-label text-md-end">{{ __('Name') }}</label>

                            <div class="col-md-6">
                                <input id="name" type="text" class="form-control @error('name') is-invalid @enderror" name="name" value="{{ old('name') }}" required autocomplete="name" autofocus>

                                @error('name')
                                    <span class="invalid-feedback" role="alert">
                                        <strong>{{ $message }}</strong>
                                    </span>
                                @enderror
                            </div>
                        </div>

                        <div class="row mb-3">
                            <label for="username" class="col-md-4 col-form-label text-md-end">{{ __('Username') }}</label>

                            <div class="col-md-6">
                                <input id="username" type="text" class="form-control @error('username') is-invalid @enderror" name="username" value="{{ old('username') }}" required autocomplete="username" autofocus>

                                @error('username')
                                    <span class="invalid-feedback" role="alert">
                                        <strong>{{ $message }}</strong>
                                    </span>
                                @enderror
                            </div>
                        </div>

                        <div class="row mb-3">
                            <label for="mobile_no" class="col-md-4 col-form-label text-md-end">{{ __('Mobile No') }}</label>

                            <div class="col-md-6">
                                <input id="mobile_no" type="text" class="form-control @error('mobile_no') is-invalid @enderror" name="mobile_no" value="{{ old('mobile_no') }}" required autocomplete="mobile_no" autofocus>

                                @error('mobile_no')
                                    <span class="invalid-feedback" role="alert">
                                        <strong>{{ $message }}</strong>
                                    </span>
                                @enderror
                            </div>
                        </div>

                        <div class="row mb-3">
                            <label for="email" class="col-md-4 col-form-label text-md-end">{{ __('Email Address') }}</label>

                            <div class="col-md-6">
                                <input id="email" type="email" class="form-control @error('email') is-invalid @enderror" name="email" value="{{ old('email') }}" required autocomplete="email">

                                @error('email')
                                    <span class="invalid-feedback" role="alert">
                                        <strong>{{ $message }}</strong>
                                    </span>
                                @enderror
                            </div>
                        </div>

                        <div class="row mb-3">
                            <label for="password" class="col-md-4 col-form-label text-md-end">{{ __('Password') }}</label>

                            <div class="col-md-6">
                                <input id="password" type="password" class="form-control @error('password') is-invalid @enderror" name="password" required autocomplete="new-password">

                                @error('password')
                                    <span class="invalid-feedback" role="alert">
                                        <strong>{{ $message }}</strong>
                                    </span>
                                @enderror
                            </div>
                        </div>

                        <div class="row mb-3">
                            <label for="password-confirm" class="col-md-4 col-form-label text-md-end">{{ __('Confirm Password') }}</label>

                            <div class="col-md-6">
                                <input id="password-confirm" type="password" class="form-control" name="password_confirmation" required autocomplete="new-password">
                            </div>
                        </div>

                        <div class="row mb-0">
                            <div class="col-md-6 offset-md-4">
                                <button type="submit" class="btn btn-primary">
                                    {{ __('Register') }}
                                </button>
                            </div>
                        </div>
                    </form>
                </div>
            </div>
        </div>
    </div>
</div>
@endsection
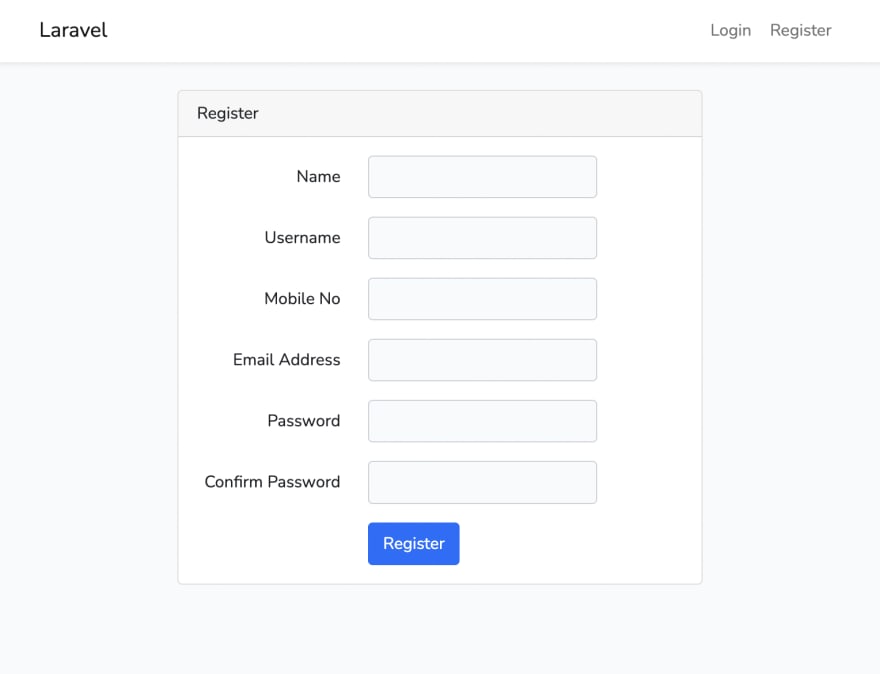
The Register form will look like this.

Next, create a table to store OTPs and a corresponding model. Run these commands.
php artisan make:model VerificationCode -m
This will generate the migration file and the model.
Let's open the VerificationCode Model app/Models/VerificationCode.php and update it with the code below.
<?php

namespace App\Models;

use Illuminate\Database\Eloquent\Factories\HasFactory;
use Illuminate\Database\Eloquent\Model;

class VerificationCode extends Model
{
    use HasFactory;

    protected $fillable = ['user_id', 'otp', 'expire_at'];
}
Edit the migration file generated in database/migrations to define your verification_codes table schema. For example.
<?php

use Illuminate\Database\Migrations\Migration;
use Illuminate\Database\Schema\Blueprint;
use Illuminate\Support\Facades\Schema;

return new class extends Migration
{
    /**
     * Run the migrations.
     *
     * @return void
     */
    public function up()
    {
        Schema::create('verification_codes', function (Blueprint $table) {
            $table->id();
            $table->bigInteger('user_id');
            $table->string('otp');
            $table->timestamp('expire_at')->nullable();
            $table->timestamps();
        });
    }

    /**
     * Reverse the migrations.
     *
     * @return void
     */
    public function down()
    {
        Schema::dropIfExists('verification_codes');
    }
};
Run the migration to create the OTP table.
php artisan migrate
Create a controller to handle OTP generation and verification. Run this command.
php artisan make:controller AuthOTPController
In the AuthOTPController, you can add methods to generate and verify OTPs. Here's an example.
<?php

namespace App\Http\Controllers;

use Carbon\Carbon;
use App\Models\User;
use Illuminate\Http\Request;
use App\Models\VerificationCode;
use Illuminate\Support\Facades\Auth;

class AuthOtpController extends Controller
{
    // Return View of OTP Login Page
    public function login()
    {
        return view('auth.otp-login');
    }

    // Generate OTP
    public function generate(Request $request)
    {
        # Validate Data
        $request->validate([
            'mobile_no' => 'required|exists:users,mobile_no'
        ]);

        # Generate An OTP
        $verificationCode = $this->generateOtp($request->mobile_no);

        $message = "Your OTP To Login is - ".$verificationCode->otp;
        # Return With OTP

        return redirect()->route('otp.verification', ['user_id' => $verificationCode->user_id])->with('success',  $message);
    }

    public function generateOtp($mobile_no)
    {
        $user = User::where('mobile_no', $mobile_no)->first();

        # User Does not Have Any Existing OTP
        $verificationCode = VerificationCode::where('user_id', $user->id)->latest()->first();

        $now = Carbon::now();

        if($verificationCode && $now->isBefore($verificationCode->expire_at)){
            return $verificationCode;
        }

        // Create a New OTP
        return VerificationCode::create([
            'user_id' => $user->id,
            'otp' => rand(123456, 999999),
            'expire_at' => Carbon::now()->addMinutes(10)
        ]);
    }

    public function verification($user_id)
    {
        return view('auth.otp-verification')->with([
            'user_id' => $user_id
        ]);
    }

    public function loginWithOtp(Request $request)
    {
        #Validation
        $request->validate([
            'user_id' => 'required|exists:users,id',
            'otp' => 'required'
        ]);

        #Validation Logic
        $verificationCode   = VerificationCode::where('user_id', $request->user_id)->where('otp', $request->otp)->first();

        $now = Carbon::now();
        if (!$verificationCode) {
            return redirect()->back()->with('error', 'Your OTP is not correct');
        }elseif($verificationCode && $now->isAfter($verificationCode->expire_at)){
            return redirect()->route('otp.login')->with('error', 'Your OTP has been expired');
        }

        $user = User::whereId($request->user_id)->first();

        if($user){
            // Expire The OTP
            $verificationCode->update([
                'expire_at' => Carbon::now()
            ]);

            Auth::login($user);

            return redirect('/home');
        }

        return redirect()->route('otp.login')->with('error', 'Your Otp is not correct');
    }
}
In your routes/web.php file, define the routes for OTP login.
Route::controller(AuthOTPController::class)->group(function(){
    Route::get('/otp/login', 'login')->name('otp.login');
    Route::post('/otp/generate', 'generate')->name('otp.generate');
    Route::get('/otp/verification/{user_id}', 'verification')->name('otp.verification');
    Route::post('/otp/login', 'loginWithOtp')->name('otp.getlogin');
});
Create view files in resources/views/auth/otp-login.blade.php folder.
@extends('layouts.app')

@section('content')
<div class="container">
    <div class="row justify-content-center">
        <div class="col-md-8">
            <div class="card">
                <div class="card-header">{{ __('OTP Login') }}</div>

                <div class="card-body">

                    @if (session('error'))
                    <div class="alert alert-danger" role="alert"> {{session('error')}}
                    </div>
                    @endif

                    <form method="POST" action="{{ route('otp.generate') }}">
                        @csrf

                        <div class="row mb-3">
                            <label for="mobile_no" class="col-md-4 col-form-label text-md-end">{{ __('Mobile No') }}</label>

                            <div class="col-md-6">
                                <input id="mobile_no" type="text" class="form-control @error('mobile_no') is-invalid @enderror" name="mobile_no" value="{{ old('mobile_no') }}" required autocomplete="mobile_no" autofocus placeholder="Enter Your Registered Mobile Number">

                                @error('mobile_no')
                                    <span class="invalid-feedback" role="alert">
                                        <strong>{{ $message }}</strong>
                                    </span>
                                @enderror
                            </div>
                        </div>


                        <div class="row mb-0">
                            <div class="col-md-8 offset-md-4">
                                <button type="submit" class="btn btn-primary">
                                    {{ __('Generate OTP') }}
                                </button>

                                @if (Route::has('login'))
                                    <a class="btn btn-link" href="{{ route('login') }}">
                                        {{ __('Login With Username') }}
                                    </a>
                                @endif
                            </div>
                        </div>
                    </form>
                </div>
            </div>
        </div>
    </div>
</div>
@endsection
Next, create otp-verification.blade.php file and update the below code.
@extends('layouts.app')

@section('content')
<div class="container">
    <div class="row justify-content-center">
        <div class="col-md-8">
            <div class="card">
                <div class="card-header">{{ __('OTP Login') }}</div>

                <div class="card-body">
                    @if (session('success'))
                    <div class="alert alert-success" role="alert"> {{session('success')}}
                    </div>
                    @endif

                    @if (session('error'))
                    <div class="alert alert-danger" role="alert"> {{session('error')}}
                    </div>
                    @endif

                    <form method="POST" action="{{ route('otp.getlogin') }}">
                        @csrf
                        <input type="hidden" name="user_id" value="{{$user_id}}" />
                        <div class="row mb-3">
                            <label for="mobile_no" class="col-md-4 col-form-label text-md-end">{{ __('OTP') }}</label>

                            <div class="col-md-6">
                                <input id="otp" type="text" class="form-control @error('otp') is-invalid @enderror" name="otp" value="{{ old('otp') }}" required autocomplete="otp" autofocus placeholder="Enter OTP">

                                @error('otp')
                                    <span class="invalid-feedback" role="alert">
                                        <strong>{{ $message }}</strong>
                                    </span>
                                @enderror
                            </div>
                        </div>


                        <div class="row mb-0">
                            <div class="col-md-8 offset-md-4">
                                <button type="submit" class="btn btn-primary">
                                    {{ __('Login') }}
                                </button>
                            </div>
                        </div>
                    </form>
                </div>
            </div>
        </div>
    </div>
</div>
@endsection
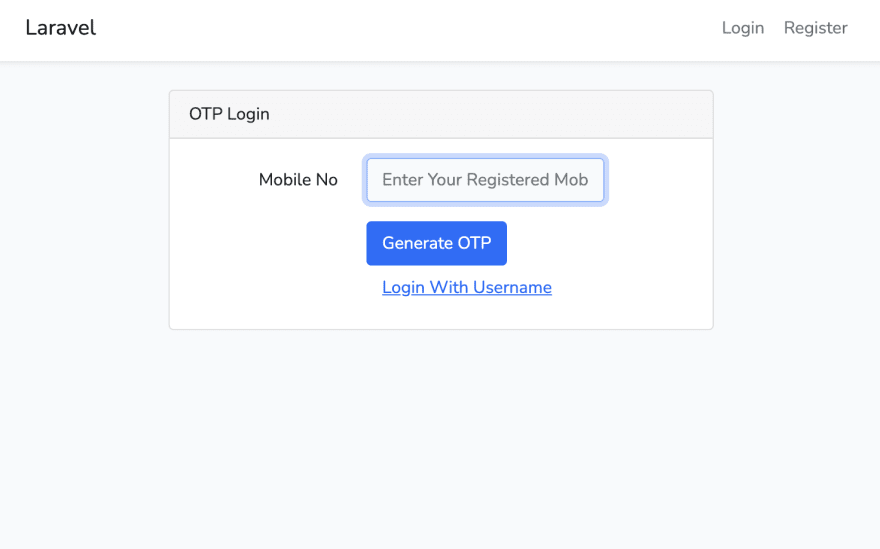
Output:

You might also like:
Recommended Post
Featured Post

How To Increase Session Lifeti...
In this article, we will see how to increase session timeout in laravel. In this example, we can see how to se...
Jun-28-2020

What Is Digital Marketing?
Digital marketing is the component of marketing that utilizes internet and online bas...
Oct-19-2021

How To Send Email With Attachm...
Hello Guys, In this tutorial we will see how to send email with attachment using node.js app. In this tutorial w...
Aug-09-2021

Login with Mobile Number using...
In this tutorial i will show you how to login with mobile number in laravel using Laravel Custom Auth , laravel pro...
Jun-18-2021