REST API In Laravel
Websolutionstuff | Aug-26-2020 | Categories : Laravel PHP
In this article, we will explore the world of RESTful APIs in the context of Laravel, encompassing versions 8, 9, and 10. REST API, or Representational State Transfer Application Programming Interface, relies on HTTP requests to facilitate data operations like GET, PUT, POST, and DELETE.
Our tutorial will walk you through CRUD (Create, Read, Update, Delete) operations using REST API, shedding light on the creation of RESTful APIs with authentication, including the use of Laravel Passport, a powerful tool for user validation. We will also delve into the process of retrieving data through APIs.
Laravel simplifies the creation of APIs, particularly when incorporating authentication for mobile applications, thanks to Laravel Passport, which streamlines the generation of authentication tokens.
Let's embark on this journey to explore REST API, CRUD operations, and the art of crafting RESTful APIs in Laravel 8, 9, and 10
Type the following command in the terminal to create a new project.
composer create-project --prefer-dist laravel/laravel REST_API
Now, we need to install Passport using the Composer package manager. To do this, execute the following command in your terminal.
composer require laravel/passport
After installing the package, you need to obtain the default migration to create new Passport tables in your database. To do this, run the following command.
php artisan migrate
Now, let's install Passport using the passport:install command. This command generates token keys for enhanced security. Run the following command.
php artisan passport:install
Now, we need to configure Passport in three places: the model, the service provider, and the auth configuration file.
1) HasApiTokens class of Passport has been added in the User model,
Add the below code in app/User.php
<?php

namespace App;

use Illuminate\Contracts\Auth\MustVerifyEmail;
use Illuminate\Foundation\Auth\User as Authenticatable;
use Illuminate\Notifications\Notifiable;
use Laravel\Passport\HasApiTokens;

class User extends Authenticatable implements MustVerifyEmail
{
    use Notifiable,HasApiTokens;

    /**
     * The attributes that are mass assignable.
     *
     * @var array
     */
    protected $fillable = [
        'name', 'email', 'password',
    ];

    /**
     * The attributes that should be hidden for arrays.
     *
     * @var array
     */
    protected $hidden = [
        'password', 'remember_token',
    ];

    /**
     * The attributes that should be cast to native types.
     *
     * @var array
     */
    protected $casts = [
        'email_verified_at' => 'datetime',
    ];
}
2) In AuthServiceProvider we have added "Passport::routes()"
Add below code app/Providers/AuthServiceProvider.php
<?php

namespace App\Providers;

use Illuminate\Foundation\Support\Providers\AuthServiceProvider as ServiceProvider;
use Illuminate\Support\Facades\Gate;
use Laravel\Passport\Passport;

class AuthServiceProvider extends ServiceProvider
{
    /**
     * The policy mappings for the application.
     *
     * @var array
     */
    protected $policies = [
        'App\Model' => 'App\Policies\ModelPolicy',
    ];

    /**
     * Register any authentication / authorization services.
     *
     * @return void
     */
    public function boot()
    {
        $this->registerPolicies();

        //
    }
}
3) We have added api auth configuration in auth.php.
In config/auth.php add the below code.
<?php

return [

    'guards' => [
        'web' => [
            'driver' => 'session',
            'provider' => 'users',
        ],

        'api' => [
            'driver' => 'passport',
            'provider' => 'users',
        ],
    ],
];
In this step, we will create a migration for the Product table using the php artisan command. Run the following command in your terminal:
php artisan make:migration create_products_table
After running the aforementioned command, you will locate the migration in the following path: database/migrations. In your migration file, add the following code to create the products table.
<?php

use Illuminate\Database\Migrations\Migration;
use Illuminate\Database\Schema\Blueprint;
use Illuminate\Support\Facades\Schema;

class CreateProductsTable extends Migration
{
    /**
     * Run the migrations.
     *
     * @return void
     */
    public function up()
    {
        Schema::create('products', function (Blueprint $table) {
            $table->id();
            $table->string('name');
            $table->text('detail');
            $table->timestamps();
        });
    }

    /**
     * Reverse the migrations.
     *
     * @return void
     */
    public function down()
    {
        Schema::dropIfExists('products');
    }
}
Now, run the below code in the terminal to create a migration.
php artisan migrate
And add the below code in the app/Product.php file
<?php

namespace App;

use Illuminate\Database\Eloquent\Model;

class Product extends Model
{
    protected $fillable = [
        'name', 'detail'
    ];
}
In step 5, we will create API routes. Laravel offers an api.php file for defining web service routes. Let's add a route in the routes/api.php file.
<?php
use Illuminate\Http\Request;
use Illuminate\Support\Facades\Route;
Route::middleware('auth:api')->get('/user', function (Request $request) {
return $request->user();
});
Route::post('register', 'API\RegisterController@register');
Route::post('login', 'API\RegisterController@login');
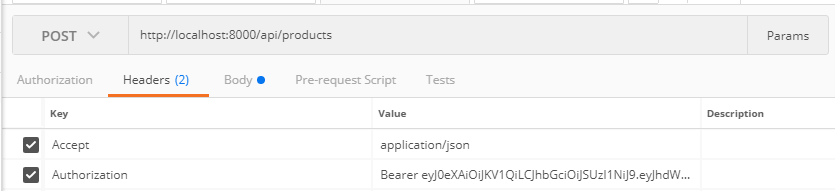
Route::middleware('auth:api')->group( function () {
Route::resource('products', 'API\ProductController');
});
Now, I have created BaseController, ProductController, and RegisterController in api folder.
app/Http/Controllers/API/BaseController.php
<?php

namespace App\Http\Controllers\API;

use App\Http\Controllers\Controller;
use Illuminate\Http\Request;

class BaseController extends Controller
{
    public function sendResponse($result, $message)
    {
    	$response = [
            'success' => true,
            'data'    => $result,
            'message' => $message,
        ];
        return response()->json($response, 200);
    }

    public function sendError($error, $errorMessages = [], $code = 404)
    {
    	$response = [
            'success' => false,
            'message' => $error,
        ];

        if(!empty($errorMessages)){
            $response['data'] = $errorMessages;
        }

        return response()->json($response, $code);
    }

}
app/Http/Controllers/API/ProductController.php
<?php
namespace App\Http\Controllers\API;
use App\Http\Controllers\Controller;
use Illuminate\Http\Request;
use App\Product;
use Validator;
use App\Http\Controllers\API\BaseController as BaseController;
use App\Http\Resources\Product as ProductResource;
class ProductController extends BaseController
{
/**
* Display a listing of the resource.
*
* @return \Illuminate\Http\Response
*/
public function index()
{
$products = Product::all();
return $this->sendResponse(ProductResource::collection($products), 'Products Retrieved Successfully.');
}
/**
* Show the form for creating a new resource.
*
* @return \Illuminate\Http\Response
*/
public function create()
{
}
/**
* Store a newly created resource in storage.
*
* @param \Illuminate\Http\Request $request
* @return \Illuminate\Http\Response
*/
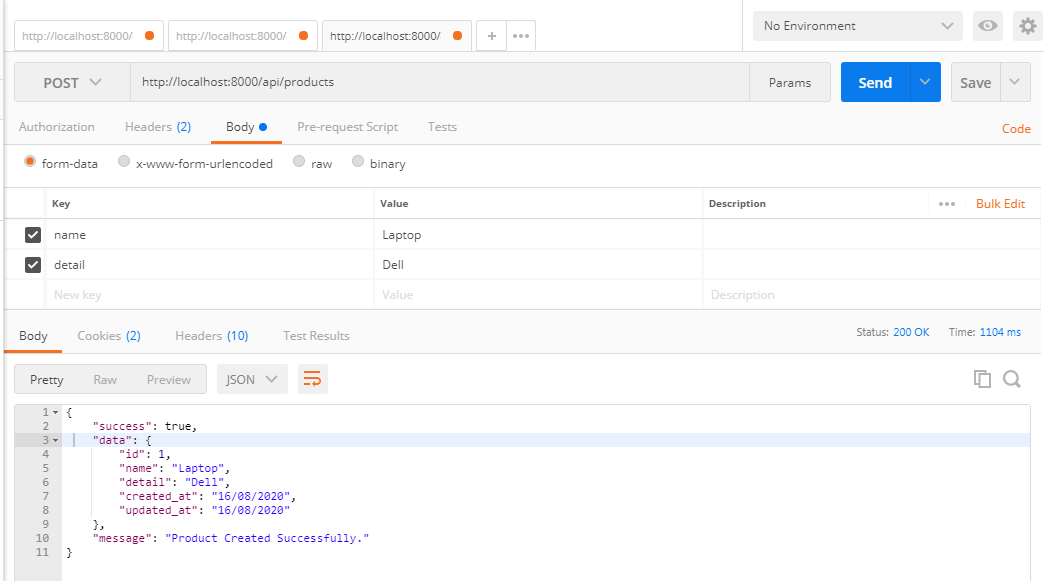
public function store(Request $request)
{
$input = $request->all();
$validator = Validator::make($input, [
'name' => 'required',
'detail' => 'required'
]);
if($validator->fails()){
return $this->sendError('Validation Error.', $validator->errors());
}
$product = Product::create($input);
return $this->sendResponse(new ProductResource($product), 'Product Created Successfully.');
}
/**
* Display the specified resource.
*
* @param int $id
* @return \Illuminate\Http\Response
*/
public function show($id)
{
$product = Product::find($id);
if (is_null($product)) {
return $this->sendError('Product not found.');
}
return $this->sendResponse(new ProductResource($product), 'Product Retrieved Successfully.');
}
/**
* Show the form for editing the specified resource.
*
* @param int $id
* @return \Illuminate\Http\Response
*/
public function edit($id)
{
//
}
/**
* Update the specified resource in storage.
*
* @param \Illuminate\Http\Request $request
* @param int $id
* @return \Illuminate\Http\Response
*/
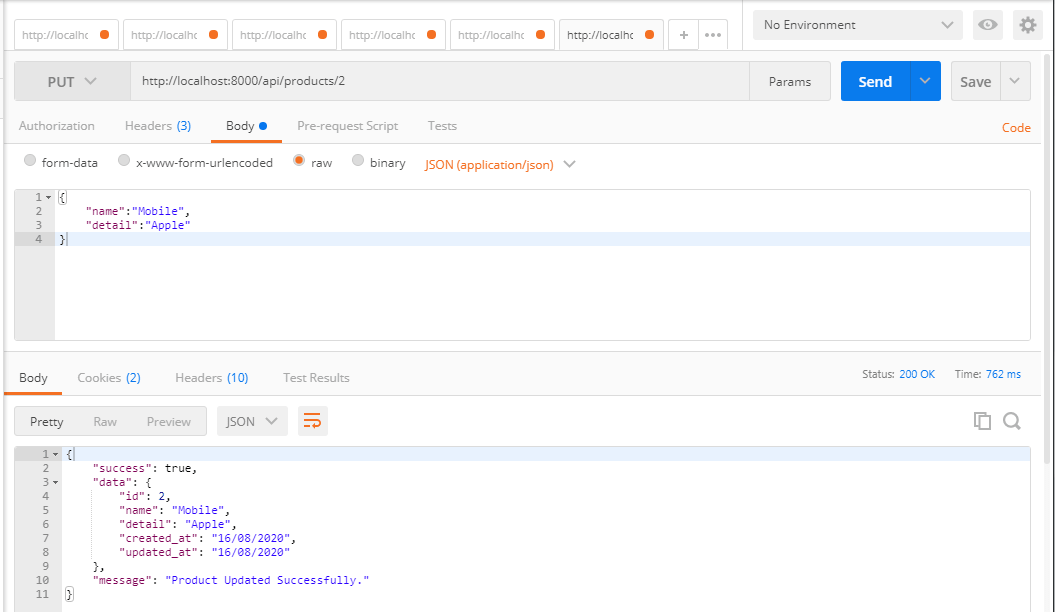
public function update(Request $request, $id)
{
$input = $request->all();
$validator = Validator::make($input, [
'name' => 'required',
'detail' => 'required'
]);
if($validator->fails()){
return $this->sendError('Validation Error.', $validator->errors());
}
$product = Product::find($id);
$product->name = $input['name'];
$product->detail = $input['detail'];
$product->save();
return $this->sendResponse(new ProductResource($product), 'Product Updated Successfully.');
}
/**
* Remove the specified resource from storage.
*
* @param int $id
* @return \Illuminate\Http\Response
*/
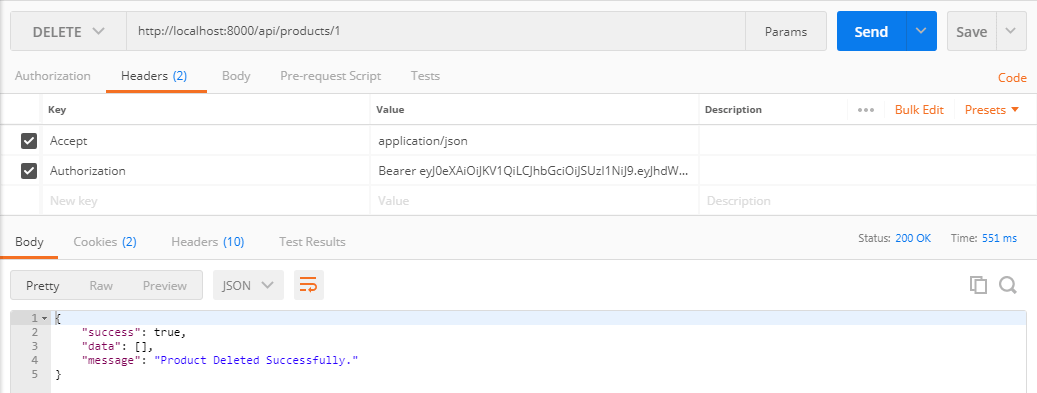
public function destroy($id)
{
$product = Product::find($id);
$product->delete();
return $this->sendResponse([], 'Product Deleted Successfully.');
}
}
app/Http/Controllers/API/RegisterController.php
<?php
namespace App\Http\Controllers\API;
use App\Http\Controllers\Controller;
use Illuminate\Http\Request;
use App\Http\Controllers\API\BaseController as BaseController;
use App\User;
use Illuminate\Support\Facades\Auth;
use Validator;
class RegisterController extends BaseController
{
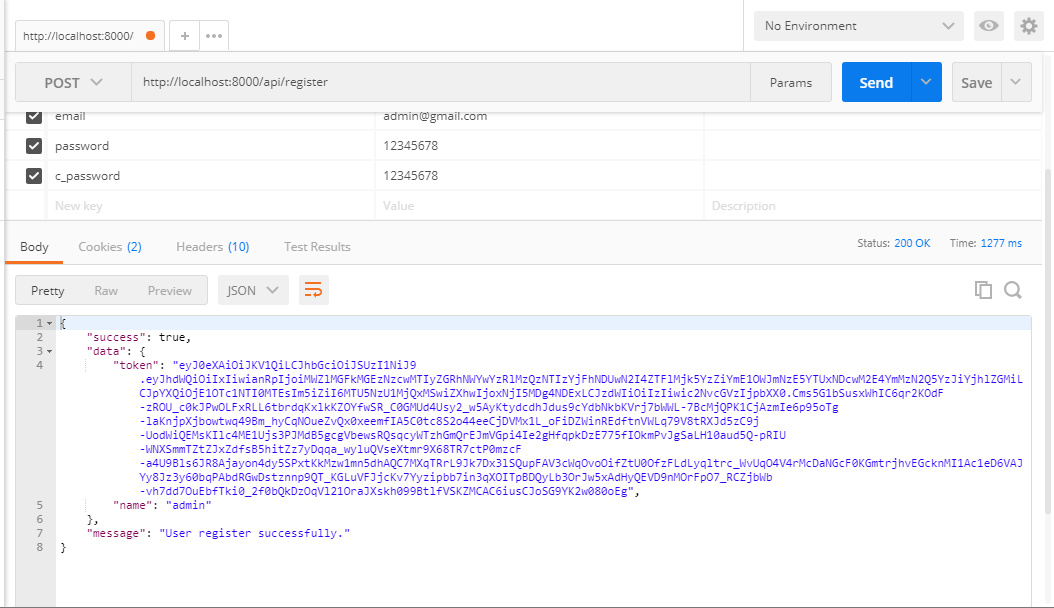
public function register(Request $request)
{
$validator = Validator::make($request->all(), [
'name' => 'required',
'email' => 'required|email',
'password' => 'required',
'c_password' => 'required|same:password',
]);
if($validator->fails()){
return $this->sendError('Validation Error.', $validator->errors());
}
$input = $request->all();
$input['password'] = bcrypt($input['password']);
$user = User::create($input);
$success['token'] = $user->createToken('MyApp')->accessToken;
$success['name'] = $user->name;
return $this->sendResponse($success, 'User register successfully.');
}
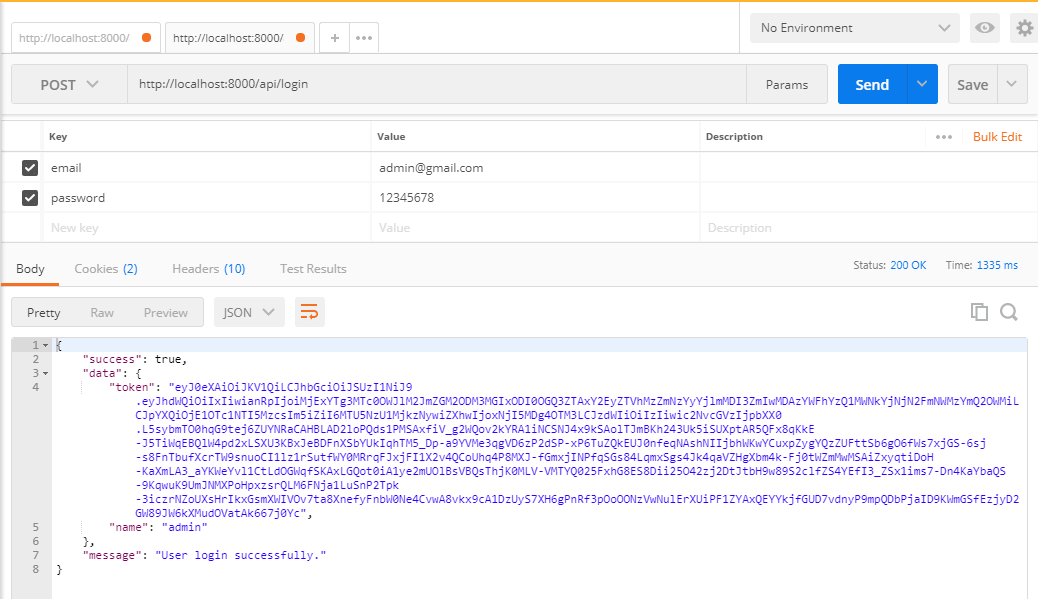
public function login(Request $request)
{
if(Auth::attempt(['email' => $request->email, 'password' => $request->password])){
$user = Auth::user();
$success['token'] = $user->createToken('MyApp')->accessToken;
$success['name'] = $user->name;
return $this->sendResponse($success, 'User login successfully.');
}
else{
return $this->sendError('Unauthorised.', ['error'=>'Unauthorised']);
}
}
}
Now, we need to create API resources. Laravel's resource classes provide a convenient way to transform models and collections into JSON format in an expressive and straightforward manner.
php artisan make:resource Product
Now, a New file is created on this app/Http/Resources/Product.php path.
<?php

namespace App\Http\Resources;

use Illuminate\Http\Resources\Json\JsonResource;

class Product extends JsonResource
{
    /**
     * Transform the resource into an array.
     *
     * @param  \Illuminate\Http\Request  $request
     * @return array
     */
    public function toArray($request)
    {
        return [
            'id' => $this->id,
            'name' => $this->name,
            'detail' => $this->detail,
            'created_at' => $this->created_at->format('d/m/Y'),
            'updated_at' => $this->updated_at->format('d/m/Y'),
        ];
    }
}
After implementing all the necessary code, we are prepared to run a full RESTful API in Laravel.
For testing and validation, we will use the POSTMAN API. POSTMAN is a versatile collaboration platform designed for API development. It offers a range of features that simplify each stage of API creation and enhance collaboration, ultimately speeding up the API development process.
To aid in your understanding, we have included screenshots and descriptions related to POSTMAN in this article.
First and foremost, you need to register on POSTMAN to explore and test our example

Finally, We are done with our code and it's your time to implement it in your project.
In conclusion, we have embarked on a journey to explore the world of RESTful APIs in Laravel, covering versions 8, 9, and 10. We have learned the essential steps to create robust and secure APIs, including the installation of Laravel Passport for enhanced authentication.
Our journey has included the creation of API routes, resource classes, and database migrations. We've leveraged the power of Laravel to transform our models and collections into JSON responses.
By following this comprehensive guide, you can confidently build, test, and manage RESTful APIs in your Laravel applications. Whether you're working on mobile apps, web services, or any project that requires data interaction, this knowledge will prove invaluable.
You might also like:
- Read Also: Laravel 8 User Role and Permission
- Read Also: How To Get Current User Location In Laravel
- Read Also: How to Send E-mail Using Queue in Laravel 7/8
- Read Also: How to Create Multi Language Website in Laravel
Recommended Post
Featured Post

How To Upload And Preview Imag...
In this article, we will see how to upload and preview images in react js. You can learn how to show an i...
Sep-06-2022

How To Create Dark and Light M...
In this article, we will see how to create a dark and light mode website using jquery. As you can see many websites and...
Nov-21-2020

How to Change Date Format in L...
Hello developers! In this article, we'll see how to change the date format in laravel 11. Here, we'll learn...
Apr-29-2024

How To File Upload In React JS
In this article, we will see how file uploads in react js. File uploading means a user from a client machine wants...
Sep-05-2022